JHAIM ALEMAN AI4C
UNIT4
HUMAN MODEL
CHAT GPT
REFERENCE IMAGE
CHATGPT STARTING PROMPT:
Please generate a very detail prompt to recreate this set up for a hyper realistic set of photographies that will be generated with a different model and outfit. The goal is to match the setting, lighting, texture and flow of the images to generate a new hyper realistic replica that looks high end and editorial just like this samples. We will be generating the new images using ChatGPT. I will be including 2 reference files. one with the images of the new model and the other with the outfit and accessories. Can you include in the prompt a reference for pulling that information from those files to generate the images. The generated images will be individual files not placed all together like in the reference file attached here.
CHAT GPT GENERATED PROMPT:
MASTER PROMPT — FOUR-IMAGE LUXURY STUDIO EDITORIAL
Creative objective
Create a cohesive series of four exceptionally photorealistic fashion editorial photographs using the supplied references. Recreate the studio setting, lighting character, photographic texture, tonal treatment, composition, relaxed posing, and understated editorial atmosphere of Reference 1, while replacing the original subject entirely with the model from Reference 2 and replacing the original styling entirely with the outfit and accessories from Reference 3.
The result should feel like a real fashion story photographed during one continuous studio session: thoughtful but unforced, tactile, quietly confident, and elevated without appearing excessively polished or digitally manufactured. These must look like photographs of a real person wearing real clothing in a physical studio—not illustrations, CGI, beauty renders, or heavily retouched AI portraits.
The four photographs must be generated as individual, full-frame images. Do not combine them into a collage, contact sheet, diptych, grid, magazine spread, or multi-panel layout.
1. Reference hierarchy — keep each reference’s purpose separate
REFERENCE 1 — PHOTOGRAPHIC SETUP AND CREATIVE DIRECTION
The four-image editorial sheet is the visual authority for: The studio environment and background color; the softness and direction of the light; the relationship between subject and background; the camera perspective; the four framing variations; the relaxed body language; the restrained expressions; the balance of sharp detail and gentle photographic softness; and the overall color, contrast, grain, and editorial mood.
Treat its four panels as four separate shot references:
Shot 1: Upper-left panel — close, leaning portrait with hands engaging the front of the outfit.
Shot 2: Upper-right panel — relaxed seated portrait on a simple studio stool, with one leg crossed and one hand near the face.
Shot 3: Lower-left panel — full-length standing fashion portrait.
Shot 4: Lower-right panel — closer standing portrait with a relaxed diagonal body line and an approximately knee-length crop.
Do not reproduce the original model’s identity, facial features, haircut, hair color, skin tone, body type, or clothing. Do not copy the original outfit simply because it contributes to the sample’s aesthetic.
The original model and wardrobe are not the subjects of the new photographs.
REFERENCE 2 — NEW MODEL / IDENTITY AUTHORITY
Use the person shown in Reference 2 as the sole identity for all four images. Study all available views to establish a consistent understanding of the model’s face and appearance. Preserve their recognizable facial structure, eye shape and spacing, eyebrows, nose, lips, jawline, cheekbones, ears, hairline, hairstyle, hair color, skin tone, and visible distinguishing features. Preserve the model’s natural body proportions and apparent age. Do not reshape the person to resemble the model in Reference 1. Do not introduce a generic “fashion model” face or alter their identity through excessive beautification.
The same person must remain recognizable across close-up, seated, and full-length views, including when the head is tilted or photographed from a different angle. Integrate the model naturally into the new photography. Do not create the appearance of a face pasted onto the original subject’s body. Clothing, jewelry, and other incidental styling visible in the model reference should not carry into the final images unless they also appear in Reference 3.
REFERENCE 3 — OUTFIT AND ACCESSORIES / STYLING AUTHORITY
Use Reference 3 as the sole authority for the clothing, footwear, and accessories. Reproduce the supplied outfit faithfully, including its actual colors, silhouette, proportions, layering, neckline, collar construction, sleeve length, shoulder structure, seams, fastenings, waistband, hems, and visible decorative details. Respect the materials shown in this reference. Render each fabric with its appropriate weight, texture, reflectivity, thickness, and drape. Do not automatically give the new outfit the wool-like texture or muted gray-brown color of the original sample. Preserve the intended styling: whether garments are tucked or untucked, open or closed, belted or unbelted, loose or fitted. Keep accessories in their proper wearing positions.
Do not add styling pieces, invent pockets, change footwear, substitute jewelry, or introduce a handbag or glasses that are not part of the supplied outfit. Where branding is visible and clearly defined, follow the reference rather than inventing new lettering or logos. Reference 2 controls identity. Reference 3 controls wardrobe. Reference 1 controls photography and art direction. When a pose from Reference 1 is incompatible with the new clothing or accessories, adapt the pose minimally rather than changing the outfit.
2. Studio setting and background
Recreate a minimal studio with a continuous matte paper backdrop and matching floor sweep. The background should read as a pale warm gray-beige with a delicate dusty-rose undertone: subdued, softly atmospheric, and neutral enough to complement the clothing. It should not become distinctly pink, peach, purple, bright white, or cool concrete gray. Create a natural, gradual transition between the wall and floor. Avoid a visible horizon line, baseboard, corner, or architectural feature. Allow very subtle tonal variation from the studio lighting, with a slightly deeper tone where the floor and subject shadows naturally require it. The background should not look like a perfectly uniform digital color fill, but it must remain visually quiet. Keep the set empty. The only additional object should be the simple dark studio stool required for Shot 2. Do not add plants, furniture, decorative objects, visible lighting equipment, background graphics, or artificial texture overlays. For standing photographs, include credible, soft contact shadows beneath the footwear so the model feels physically grounded on the studio floor.
3. Lighting character
Match the visible lighting effect in Reference 1: broad, soft, directional studio light with gentle modeling and controlled highlights. Use the visual effect of a large, heavily diffused light positioned high toward camera-right and angled softly downward. Let the supplied reference guide the final direction and shadow placement. The light should wrap naturally across the forehead, cheeks, nose, hands, and clothing. Maintain a gentle progression from the illuminated side into the shadow side rather than a sharp division. Use restrained ambient fill from the opposite side, sufficient to retain detail without flattening the face or removing the garment’s dimensionality. The face should retain soft shadows around the cheekbones, beneath the jaw, and inside the natural contours of the eyes. Clothing should show enough directional shading to reveal folds, seams, and material weight.
Highlights should be broad and softly controlled. Preserve natural skin sheen, but avoid glossy beauty-lighting effects, oily-looking skin, or bright specular hotspots. Do not use hard flash, dramatic spotlights, strong rim lights, colored lighting, obvious backlighting, ring-light reflections, or a bright halo around the model. The background should remain gently illuminated, not blown out. Keep subtle separation between the subject and backdrop without creating a theatrical spotlight effect.
4. Photographic rendering, color, and texture
Use the visual language of a real, high-end fashion editorial photograph with a lightly analog character. Maintain natural skin texture, including realistic pores, fine facial hair where visible, subtle under-eye texture, lip texture, and small variations in complexion. Preserve these details without exaggerating them. Avoid waxy skin, excessive smoothing, uniformly perfect pores, artificial facial symmetry, or overly sculpted features. Render hair as believable strands and small natural groupings, with realistic edges and light interaction—not a solid helmet, painted texture, or excessively sharpened outline. Clothing must have physically convincing construction and drape. Folds should originate from actual points of tension, compression, gravity, and contact with the body. Where fabric gathers at the waist, elbows, knees, or seated hips, make the compression consistent with the pose and the material. Do not create decorative folds that have no physical cause.
Use restrained saturation, warm-neutral midtones, soft highlight roll-off, and moderate contrast. Keep shadow detail without making the image look washed out. Preserve the real colors of the new outfit. The editorial grade should harmonize the scene, not recolor the garments or significantly change the model’s complexion. Introduce only subtle, fine photographic grain, consistent across the series. It should feel integrated into the image rather than like a visible noise layer. Avoid excessive clarity, crunchy sharpening, HDR effects, artificial edge halos, smeared textures, and unnaturally perfect digital surfaces. The desired finish is tactile and photographic: detailed enough to feel real, but not hyper-sharpened or clinically polished.
5. Camera perspective and framing
Compose each image as a vertical 3:4 portrait, following the proportions of the individual panels in Reference 1 rather than the proportions of the entire reference sheet. Use a natural, moderately compressed portrait perspective—the visual character of approximately a 70–105 mm full-frame-equivalent lens, adjusted as needed for each framing. Avoid wide-angle distortion, enlarged noses, stretched limbs, oversized foreground shoes, tiny heads, or unnaturally elongated bodies.
Keep the eyes convincingly focused in the closer portraits. Use enough depth of field for important garment details and hands to remain believable and readable. The background may be gently softened, but it should not dissolve into exaggerated portrait-mode blur. Allow slight photographic softness where appropriate. Not every surface needs identical sharpness. Keep the camera level unless a very subtle adjustment is needed to match a particular reference composition. The diagonal energy should come primarily from the model’s posture, not an obviously tilted camera.
All four images should be full bleed: no white borders, frames, page margins, captions, or reference thumbnails.
6. Expression, body language, and series continuity
Direct the model with a calm, self-possessed editorial attitude. Expressions should be restrained and human: relaxed lips, a natural jaw, attentive eyes, and a quiet connection with the camera. Avoid exaggerated expressions, a forced smile, an aggressive stare, or a blank mannequin-like face. Poses should feel like small, natural movements within one shoot rather than four unrelated performances. Maintain the same hairstyle, grooming, makeup treatment, wardrobe arrangement, accessory placement, lighting direction, background color, and photographic finish throughout. Garments should respond differently to each pose while retaining the same construction and fit. Do not freeze identical folds onto the outfit across all four photographs.
Preserve the model’s anatomy and proportions consistently. Do not make the person noticeably taller, thinner, broader, or more muscular from one image to another.
SHOT 1 — CLOSE LEANING EDITORIAL PORTRAIT
Use the upper-left panel of Reference 1 as the composition and body-language guide. Create a close vertical portrait framed from above the head to approximately the lower torso or waist. Include both hands naturally near the lower portion of the frame. The model leans slightly toward the camera and toward the viewer’s left, introducing a relaxed diagonal through the head, shoulders, and torso.
Position the head in the upper portion of the image, slightly left of center. Allow the torso to fill the lower and right portions of the composition, with an intentional close crop at the outer shoulder or arm where appropriate. Keep the face turned toward the lens, with a subtle head tilt and direct, composed eye contact. The hands should engage lightly with the front of the outfit near the waist. If the supplied garment has an open front, the model may loosely hold its existing edges. If it does not, adapt the hands to rest naturally at the waist or interact gently with an existing seam or hem. Do not invent a jacket opening, belt, button, or garment layer to reproduce the original hand position. Make the hands relaxed and anatomically correct, with believable knuckle shapes and natural fabric compression. Emphasize the model’s identity, facial expression, tactile garment detail, and the soft light across the face.
The photograph should feel intimate and spontaneous without looking candid or poorly composed.
SHOT 2 — RELAXED SEATED STOOL PORTRAIT
Use the upper-right panel of Reference 1 as the composition and posing guide. Seat the model on a simple dark studio stool with a modest seat, narrow central support, and understated legs. The stool should function as a quiet studio prop, not a design statement. Create a relaxed seated pose with one ankle resting across the opposite thigh, forming a broad diagonal through the lower half of the image. The crossed leg should extend toward the viewer’s left, while its footwear appears closer to the camera near the lower center-right, following the spatial arrangement of the reference. Preserve believable foreshortening. The foreground footwear can appear slightly closer and larger, but it must not dominate the frame or become distorted. On the viewer’s left, bring one hand gently toward the cheek or jaw, with the elbow naturally supported by the raised leg. Keep the fingers relaxed rather than pressing the face into an exaggerated pose. Rest the other hand naturally on the crossed leg or lap. The model should maintain calm eye contact with the camera, with the torso slightly angled rather than rigidly square. Frame from above the head through the crossed leg and a portion of the stool and lower supporting leg. It is acceptable for the bottom edge to crop the supporting leg, as in the reference. Adapt the exact leg crossing only when necessary for the supplied outfit or footwear to sit naturally. Preserve the relaxed seated geometry without compromising garment fidelity or anatomical plausibility.
Show realistic compression at the hips, knees, elbows, and waist, with natural shadows where limbs and fabrics overlap.
SHOT 3 — FULL-LENGTH STANDING PORTRAIT
Use the lower-left panel of Reference 1 as the composition and body-language guide. Create a full-length portrait showing the complete model from the top of the head to the bottom of the footwear. Position the model approximately centrally, with modest headroom and enough visible floor beneath the shoes to establish contact shadows. Keep the stance relaxed and balanced. Let the feet sit naturally apart, with a small shift of weight rather than a rigid, symmetrical stance. Allow the shoulders to remain loose and the elbows to angle gently outward where the outfit and hand placement permit. Place the hands casually at the hip or pocket area, or slightly behind the hips, following the relaxed attitude of the reference. Use pockets only if the actual garments have them. Do not invent openings or distort the clothing to accommodate the pose. Arrange the outfit so its overall silhouette, layering, fit, and footwear are clearly readable. Preserve the supplied garment lengths and styling rather than altering them to match the original clothes. Use a level camera around waist-to-lower-chest height, adjusted to preserve the model’s natural proportions without exaggerating leg length. Keep the expression understated, with the head upright and the gaze directed toward the camera.
The result should have the clarity of a full-look fashion photograph while retaining the softness and character of an editorial image—not a sterile product-catalog pose.
SHOT 4 — RELAXED THREE-QUARTER STANDING PORTRAIT
Use the lower-right panel of Reference 1 as the composition and posing guide. Create a closer standing portrait framed from above the head to approximately the knees, following the reference’s crop and visual balance. Angle the torso slightly away from the camera while turning the face back toward the lens. Introduce a subtle lean and head tilt so the body creates a relaxed diagonal rather than a straight vertical line. Let the model settle naturally into one hip. Keep the shoulders dropped and the posture composed but unforced. Place the hands casually in existing pockets when appropriate. If the new outfit does not have pockets, use a similarly relaxed position at the hip or alongside the body. Preserve the garment’s natural silhouette. Any opening, overlap, waistband, or accessory should appear only as it exists in the wardrobe reference. Keep the face clearly readable, with a calm expression and direct connection to the camera. Give equal attention to the face and the midsection styling: the way the fabric falls, the relationship between layers, and the natural tension around the waist and hands. Leave a comfortable amount of neutral background around the upper body while allowing the lower garment to extend naturally beyond the frame. The image should feel like a closer companion to Shot 3, photographed moments later during the same session.
Final quality requirements
Before finalizing each photograph, check that the model remains faithful to Reference 2 and that every visible clothing item and accessory follows Reference 3. Check hands, fingers, wrists, elbows, knees, ankles, and limb overlaps for natural anatomy. Ensure that jewelry, straps, and garment edges do not merge into the skin or surrounding fabric. Maintain real contact between the model, clothing, stool, and floor. Avoid floating accessories, unsupported limbs, impossible fabric intersections, and mismatched shadows. Do not introduce repetitive background patterns, synthetic-looking fabric detail, random stitching, invented closures, false logos, or facial features borrowed from Reference 1. Do not add text, watermarks, borders, reference images, duplicate figures, or layout elements. Prioritize identity fidelity, outfit accuracy, natural anatomy, convincing light, and photographic realism over exaggerated sharpness or artificial perfection.
Generation sequence and individual-image delivery
The four shot descriptions define a coordinated series, not a multi-panel image.
Generate Shot 1 only to begin. Produce one standalone photograph containing one composition.
Wait for my request before generating Shot 2, Shot 3, or Shot 4. Each subsequent shot must also be its own standalone image, maintaining the established model identity, styling, background, lighting, and photographic finish.
If either the new-model reference or the outfit-and-accessories reference is missing or unreadable, ask me to provide it before generating. Do not substitute the original model or original clothing from the setup reference.
Begin with Shot 1: the close leaning editorial portrait.
NEW MODEL
OUTFIT
1st result
2nd Prompt
Generate as a standalone portrait using the supplied identity, styling, and photography references.
NEW SMILE VERSION
can you generate a new image using the pose on image00040 and update his face features to match smile 1.jpg. Please use the same outfit from REFERENCE 3 — OUTFIT AND ACCESSORIES / STYLING AUTHORITY. Please use the same pink backdrop as the previous generated images. use image00040 for the pose and composition. Use smile00040 for the model likeness and facial expression.
3rd Prompt
Could you make it more of a profile shot like in the sample
4th Prompt
Generate as a separate mid-thigh portrait
MODIFIED BACKGROUND COLOR: Image 1: 1. (x: 73.1%, y: 11.4%) can we try a different color background. Maybe green #5d6146 with the same lighting and texture
SECOND IMAGE
THIRD IMAGE
FOURTH IMAGE
UNIT4
TESTING RESULTS ACCURACY
CHAT GPT
REFERENCE IMAGE
CHATGPT STARTING PROMPT:
Please generate a very detail prompt to recreate this set up for a hyper realistic photography that will be generated with a different model and outfit. The goal is to match the setting, lighting and flow of the image to generate a new hyper realistic image that looks high end and editorial campaign just like this sample. We will be generating the new image using ChatGPT. I will be including 2 reference files. One with the images of the new model and the other with the outfit and accessories. Please create the prompt so it references pulling that information from those files to generate the image. It is very important to keep the features of the new model and do not alter their appearance.
CHAT GPT GENERATED PROMPT:
Use the supplied sample as Reference 1, the file containing your new model’s photographs as Reference 2, and the file containing the outfit and accessories as Reference 3.
MASTER PROMPT — HYPERREALISTIC WARM-TONED FASHION EDITORIAL PORTRAIT
Creative objective
Create one exceptionally photorealistic, high-end fashion editorial portrait using the three supplied references. Recreate the close studio composition, direct eye contact, warm neutral environment, directional sunlight-like illumination, sculptural facial shadows, tactile fabric detail, and restrained editorial atmosphere of Reference 1. Replace the original person entirely with the model shown in Reference 2, and replace the original clothing and accessories entirely with the styling shown in Reference 3. The result should feel like a genuine photograph from a luxury fashion campaign: intimate, confident, natural, and carefully composed without appearing overly styled or digitally perfected. The image must look like a real person wearing real clothing, photographed with an excellent portrait lens in a physical studio. The most important requirement is the recognizable identity of the model in Reference 2. Preserve their actual facial features, proportions, skin characteristics, and overall appearance. Do not reinterpret, beautify, or blend their face with the person in Reference 1.
The defining photographic qualities are a centered portrait, an unforced expression, warm directional light, believable shadows, authentic skin texture, and beautifully resolved clothing.
1. Reference hierarchy — keep each reference’s role strictly separate
REFERENCE 1 — PHOTOGRAPHIC SETUP AND CREATIVE DIRECTION ONLY
Use the supplied sample portrait exclusively to establish the photographic approach: framing, camera height, perspective, subject placement, body orientation, general expression, lighting direction, shadow character, background treatment, tonal balance, photographic texture, and overall editorial mood. Reproduce the feeling of a tightly composed, front-facing studio portrait against a warm peach-beige background, with light arriving from above and camera-left. Do not use the person in Reference 1 as an identity reference. Do not copy their facial structure, eye color, nose, lips, eyebrows, complexion, freckles, hair color, hairline, or hairstyle.
The original clothing and jewelry are also not styling instructions. In particular, do not automatically reproduce the pale linen garments, overlapping high neck wrap, or hoop earrings. Those elements should appear only if they are actually present in Reference 3.
REFERENCE 2 — MODEL IDENTITY AND APPEARANCE AUTHORITY
Use the uploaded file containing the new model’s photographs as the sole authority for the person’s identity and physical appearance. Study all available views of the model before generating. Use the different photographs to understand the same person’s consistent features rather than averaging them into a more generic face. A clear frontal photograph should guide the front-facing likeness, while additional views should help resolve facial depth, jaw structure, hairline, and other details. Preserve the model’s actual face shape and the relationships between their features: forehead height, temple width, cheekbone placement, cheek fullness, jaw width and angle, chin shape, eye spacing, eyelid structure, eyebrow shape, nose bridge and tip, nostril shape, lip proportions, and natural mouth asymmetry.
Keep the model’s original eye color, natural skin tone and undertones, visible identifying marks, and characteristic skin texture. Retain freckles, moles, scars, facial hair, or other distinctive details where they are clearly supported by the reference photographs. Do not invent such details or borrow them from Reference 1. Preserve the model’s recognizable hair color, hairline, length, texture, and overall hairstyle unless an explicit instruction requests a change. Do not apply the sample subject’s sleek side-parted hairstyle to the new model simply because it appears in Reference 1. Do not make the face narrower, more symmetrical, younger, more angular, or more conventionally idealized. Do not enlarge the eyes, refine the nose, inflate the lips, lift the cheekbones, or change the jawline. Maintain the model’s apparent age and natural appearance.
The new lighting may change the distribution of highlights and shadows, but it must not change the underlying anatomy. This should look like the same model photographed in a different studio setup, not a new person inspired by them.
NEW MODEL
OUTFIT
1st result
MODIFIED BACKGROUND COLOR: Can you change the background to #4A1184
REFERENCE 3 — OUTFIT AND ACCESSORIES AUTHORITY
Use the uploaded outfit and accessories file as the sole authority for the styling. Reproduce the actual garments faithfully, including their construction, neckline, collar shape, seams, closures, buttons, pockets, lapels, layering, fabric weight, surface texture, colors, and intended fit. When the file includes multiple views or detail photographs, use them together to understand the same outfit. Allow the garments to fit the new model’s natural proportions without redesigning them. Preserve the original garment structure while giving the fabric believable thickness, gravity, tension, and drape. Use only accessories that are supported by Reference 3. Do not introduce jewelry, glasses, scarves, or decorative elements from the sample photograph. Do not invent a high collar or neck wrap to imitate Reference 1 if the actual outfit does not have one. Match the photographic composition while allowing the new outfit’s real neckline and silhouette to remain intact.
Because this is a close portrait, some styling elements may naturally fall outside the frame. Do not widen the composition to show shoes, trousers, or a bag, and do not relocate accessories into unnatural positions simply to make them visible.
2. Composition and framing
Create a vertical portrait with a 2:3 aspect ratio, closely matching the visual proportions of Reference 1. Frame the model from just above the crown of the head to approximately the mid-chest. Leave a modest amount of background above the hair, with enough breathing room to avoid a cramped crop. The face should occupy the upper central portion of the image, while the neckline, shoulders, and upper garment provide structure across the lower portion. Position the model centrally. Keep the camera at approximately eye level, with a straight-on perspective. The shoulders should face mostly toward the camera, and the head should remain nearly frontal. The composition should feel balanced and direct without forcing perfect bilateral symmetry. Preserve natural differences in shoulder height, facial proportions, and the way clothing falls. Keep the entire face clearly visible. Do not crop through the hairline, chin, or an important visible accessory. Adjust the framing subtly for the new model’s hairstyle and proportions rather than compressing or reshaping them to fit the sample. The shoulders and garment may extend naturally beyond the left and right edges of the photograph. Do not include hands, studio equipment, furniture, or props.
Match the sample’s close, still, face-led composition rather than turning this into a wider fashion photograph.
3. Pose, head position, and expression
The model should stand or sit upright with relaxed shoulders, an elongated but natural posture, and no exaggerated fashion pose. Keep the head aligned comfortably with the neck and torso. Avoid an artificial head tilt, a sharply raised chin, a lowered forehead, or an unnaturally extended neck. The chin should be approximately level, with only the small adjustment needed for a natural front-facing portrait. The model should look directly into the camera with a calm, attentive gaze. The expression should feel composed, quietly confident, and emotionally present—not blank, aggressive, or overly performed. Keep the brow relaxed and the mouth natural. The lips may rest gently together or remain very slightly parted, depending on what is most consistent with the new model’s natural expression. Do not reshape the model’s mouth to reproduce the exact lip position of the person in Reference 1.
Recreate the sample’s emotional restraint and direct connection with the viewer, while retaining the new model’s own facial character.
4. Lighting — warm, directional, and naturally sculptural
Recreate the sample’s sunlight-like directional illumination, with a dominant light source positioned above and to camera-left. The light should illuminate the camera-left side of the forehead, cheek, nose, and upper garment, while allowing the camera-right side of the face to fall into a deeper but readable shadow. The light should feel warm and physically plausible, as though strong afternoon light were entering a studio from a large opening to one side. This describes the quality of the illumination; no window needs to appear in the photograph. Do not replace this lighting with flat, heavily diffused beauty lighting. The sample relies on clear direction and visible facial modeling. Use defined shadows with a modest amount of softness at their edges. The illumination should be neither razor-hard theatrical spotlighting nor an enormous frontal softbox that removes the face’s structure. The nose should cast a believable shadow toward camera-right and slightly downward, consistent with the elevated light source. Maintain corresponding shadows beneath the chin and within the actual outfit’s folds, collar, or neckline. Use restrained ambient fill so the shadow side retains skin texture and facial information without becoming as bright as the lit side. Avoid deep black patches, muddy gray shadows, or artificial shadow lifting. Highlights should reveal natural skin reflectance on the forehead, cheekbones, nose, and lips. Keep them controlled and detailed, without blown-out areas, oily shine, or beauty-render gloss. Allow the garment and any visible accessories to respond to the same light source. Buttons, seams, jewelry, and fabric folds should cast small, coherent shadows in the correct direction.
Do not add a rim light, bright hair halo, dramatic backlight, or multiple inconsistent catchlights. The image should read as one dominant directional light supported by subtle environmental reflection.
5. Background and studio environment
Use a plain, matte, warm peach-beige studio background with a restrained apricot or sandy undertone, closely informed by Reference 1. Keep the background visually simple and free of identifiable objects, seams, architectural features, or horizon lines. It should feel like a real studio backdrop rather than a digitally filled color field. Allow a slight, natural variation in illumination across the background, but keep it understated. Avoid a conspicuous spotlight circle behind the head, an artificial vignette, or a perfectly symmetrical gradient. The background should be smooth without becoming sterile. Any visible texture should come primarily from the photographic rendering and subtle grain—not from invented plaster, fabric wrinkles, or mottled wall effects.
Maintain enough separation between the model and background to keep the silhouette readable without outlining it with artificial light.
6. Color treatment and tonal balance
Use a warm, restrained editorial color treatment with natural skin color and gently sun-warmed highlights. The palette should feel cohesive with the peach-beige environment, but do not recolor the new model or outfit to make everything match the sample. Preserve the model’s actual complexion. Warm illumination may influence the surface highlights, but it must not lighten or darken their underlying skin tone, erase their undertones, or transfer the sample subject’s coloring. Preserve the colors of the outfit and accessories from Reference 3. A black garment should remain convincingly black, a white garment should remain recognizably white under warm light, and colored fabrics should retain their actual hue. Use moderate overall contrast with stronger local contrast where the directional light models the face and clothing. Keep shadow transitions rich and believable rather than crushed or excessively softened. Highlights should roll off gently, retaining information in the brightest skin and fabric areas. Avoid an orange filter, sepia treatment, oversaturated skin, teal shadows, heavy brown grading, or a washed-out vintage preset.
The warmth should appear to come from the light, backdrop, and photographic color rendering—not from a strong filter placed over the entire image.
7. Skin, eyes, hair, and natural realism
Render the skin as real skin at portrait distance: visible pores, fine facial hair, subtle variations in pigmentation, natural lip texture, and small differences between the illuminated and shaded areas. Do not smooth the complexion into plastic or exaggerate every pore into a harsh texture. The face should look detailed but photographically natural. Preserve authentic under-eye contours and normal facial asymmetry. Do not remove character from the model’s face through aggressive retouching. Keep the eyes anatomically accurate and faithful to Reference 2. Render natural moisture and restrained catchlights consistent with the main light source. Avoid unnaturally bright irises, whitened eye whites, enlarged pupils, or digitally sharpened eye edges. Hair should have believable density, individual strands, and realistic highlights. Preserve the actual hairline and the way the hair meets the forehead and temples. Do not create a painted hair surface, a perfectly cut-out edge, or unsupported flyaway patterns.
Where grooming or makeup is visible in the new model’s references, keep it understated and consistent. Do not introduce dramatic contouring, glossy lips, or a new beauty look that changes their appearance.
8. Clothing texture and physical behavior
Give the outfit the same importance as the face in terms of material realism. Render the specific fabric shown in Reference 3 rather than defaulting to the linen texture in Reference 1. A smooth fabric should remain smooth; a woven fabric should show an appropriately scaled weave; knitwear, leather, satin, or wool should retain their distinct material behavior. Fabric should bend and gather in response to the model’s shoulders, chest, and neck. Show believable seam tension, overlapping layers, thickness at edges, and contact shadows where one piece lies over another. Do not add unnecessary wrinkles for realism. Use a small number of plausible folds that follow the actual garment’s construction and the model’s posture. Keep closures, buttons, and accessory attachments correctly positioned. Avoid floating jewelry, merged fabric layers, duplicated buttons, inconsistent seams, or collars that appear fused to the skin. The clothing should feel tangible and worn by a real person—not pasted onto a portrait.
9. Camera perspective, focus, and photographic texture
Emulate the natural facial perspective of an 85–105 mm full-frame portrait lens, with enough camera distance to avoid enlarging the nose or distorting the forehead and jaw. Use an optical depth-of-field character comparable to a moderately stopped-down portrait, approximately f/5.6–f/8 in feel, rather than an extremely shallow-focus beauty image. Both eyes and the important facial features should appear clearly resolved. Retain useful detail in the visible neckline and upper garment, with a gentle, natural reduction in sharpness toward less important areas. Keep the backdrop unobtrusive without adding obvious artificial bokeh. Avoid a digitally cut-out subject against an excessively blurred background. Use refined, film-like photographic texture: subtle organic grain, natural microcontrast, gentle highlight transitions, and detailed but non-brittle edges. Film-like does not mean damaged film. Do not add scratches, dust, creases, wrinkles, light leaks, borders, or exaggerated grain.
The final image should feel like a beautifully produced campaign photograph, not a hyper-sharpened computer render.
10. Identity and styling checks before finalizing
Compare the generated face against Reference 2, not against Reference 1. Confirm that the eye shape and spacing, eyebrows, nose, lips, cheek structure, jawline, chin, hairline, and overall facial proportions still belong to the new model. Check that the lighting has not falsely narrowed the face, exaggerated the cheekbones, changed the nose, or made the model appear noticeably younger or older. Compare the visible outfit against Reference 3. Confirm that the neckline, layering, materials, colors, accessories, and construction remain faithful to that file. Then compare the photograph’s composition and lighting against Reference 1. The resemblance to the sample should come from the photographic setup, not from copying the original subject or styling. When a conflict occurs, preserve the model’s identity and the outfit’s accuracy before pursuing an exact match to the sample’s silhouette.
If an essential identity or outfit detail cannot be resolved from the supplied files, request a clearer reference rather than inventing a replacement.
11. Avoid
Avoid identity blending, generic fashion-model features, facial beautification, altered proportions, excessive symmetry, incorrect eye color, unsupported makeup, or a copied hairstyle from Reference 1. Avoid flat frontal illumination, ring-light effects, heavy diffusion, blown highlights, crushed shadows, artificial rim lighting, orange skin, and inconsistent light direction. Avoid waxy skin, excessive pore enhancement, over-sharpening, CGI-like fabrics, invented accessories, incorrect garment construction, and forced styling designed to imitate the original neck wrap. Avoid text, logos not present in the outfit reference, watermarks, borders, collages, contact sheets, and visible studio equipment.
Final generation instruction
Generate one individual, full-frame, vertical 2:3 fashion editorial photograph. Recreate the warm studio environment, close frontal composition, calm direct gaze, directional light, sculptural shadows, and natural photographic texture of Reference 1. Use only the model from Reference 2 and only the outfit and accessories from Reference 3. Preserve the new model’s identity and appearance above all else. The final photograph must look unmistakably like that person wearing the supplied outfit, photographed in the sample’s lighting and composition—not like the original reference subject and not like a newly invented face.
VIDEO
FIREFLY
Animate the uploaded portrait as a photorealistic, cinematic studio shot. Use one extremely slow, smooth forward camera push-in at eye level, ending only slightly closer than the starting frame. Keep the camera stable and the face centered; retain the top of the head and the luggage brooch in the frame.
The subject holds the original pose, direct gaze and calm expression. Human movement is limited to almost imperceptible breathing and, at most, one gentle natural blink. The head stays steady and the mouth remains relaxed and closed. Preserve the exact facial identity, facial proportions, skin texture, hair, salt-and-pepper beard, eyeglasses, black jacket, knit shirt and small luggage brooch. The glasses and brooch retain their original shape, size and placement throughout.
Maintain the warm peach background, existing soft directional studio lighting, natural skin tones and original contrast. Keep the eyes sharp, focus stable and reflections subtle. The feeling is composed, confident and understated, like a still editorial portrait gently coming to life. All movement is extremely restrained. One continuous take with stable exposure and color. No talking, gestures, head turns, wind, added sparkles, dramatic lighting effects, text or graphics.
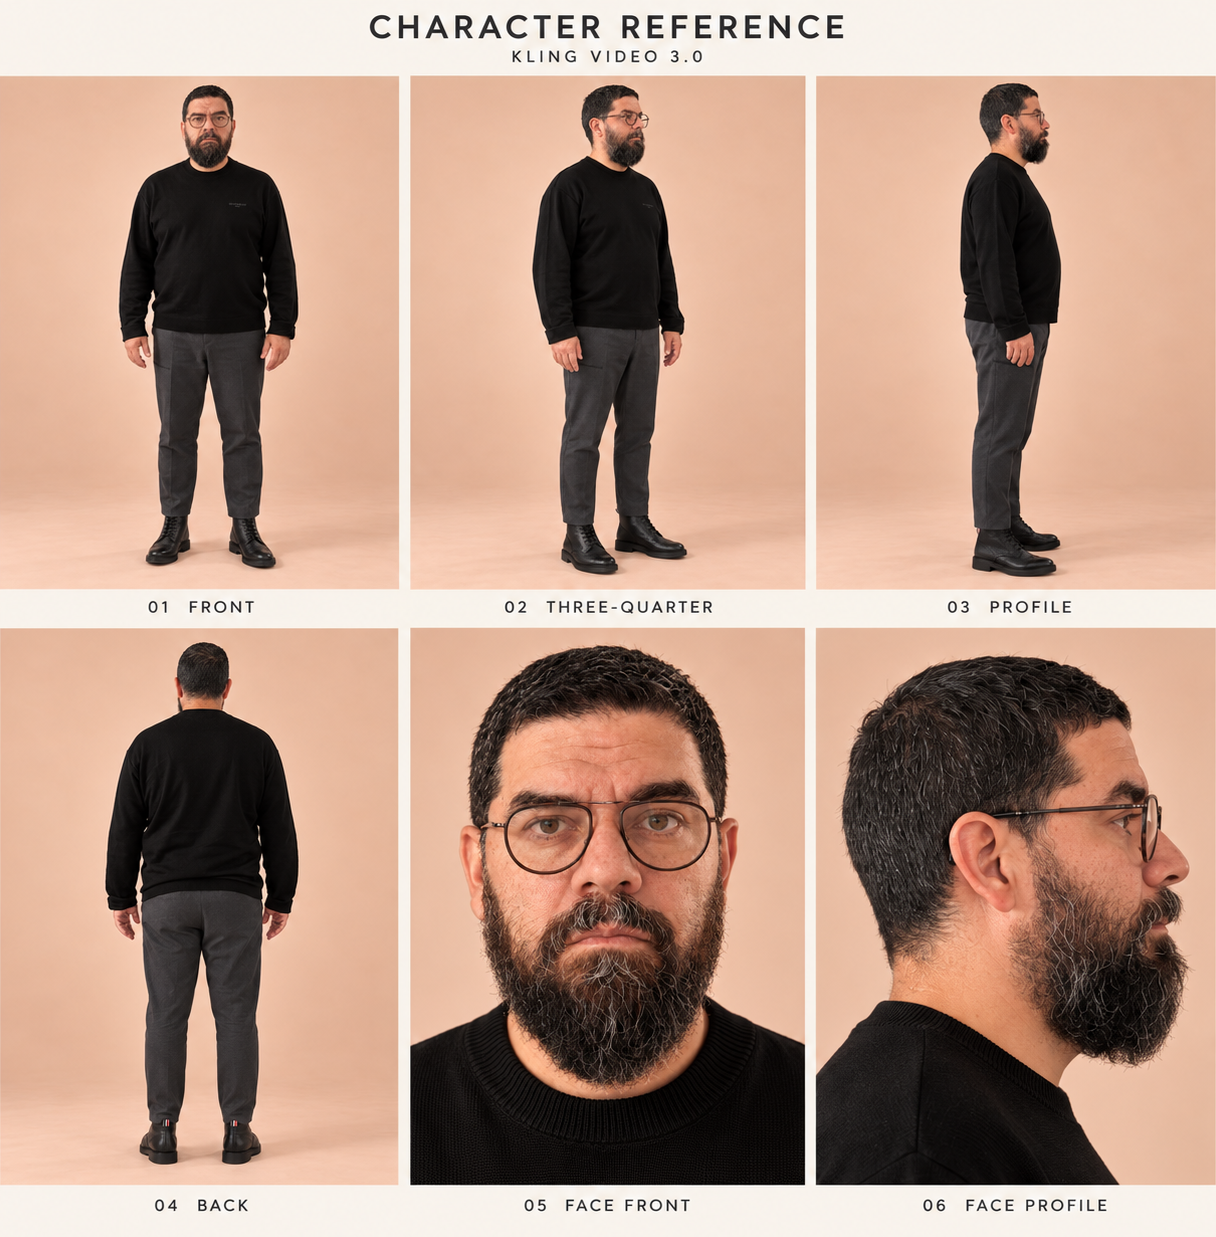
Creating full body sequence
CHAT GPT
Please built a character sheet for Kling VIDEO 3 using the attached images. Please generate using the person and outfit reference to create the assets needed to generate a video with this character.
Video generated KLING VIDEO 3.0
Prompt
Replace the suited performer in @dance_3 with the single man in @character, the six-view character sheet.REFERENCE PRIORITY
@character defines the new character’s identity, anatomy, hair, beard, glasses, clothing and footwear.
@dance_3 defines his facial performance, expressions, gaze, body movement, timing, camera and environment.
The sheet shows the character at rest. Its neutral expression must not remain fixed during the performance.FACIAL PERFORMANCE — HIGH PRIORITY
Transfer the source performer’s changing facial expressions to the new character throughout the clip, synchronized to the same moments and body movements. Match the direction, timing and intensity of eyebrow movement, eyelid opening and squinting, gaze shifts, blinks, cheek movement, lip tension, mouth shapes and jaw movement.Reproduce small smiles, smirks, mouth openings and other changes only where they occur in the source. Preserve their onset, transitions, pauses and release, including any deliberate neutral moments. Keep the source’s subtlety and natural asymmetry. Avoid a continuously serious face, a frozen mask, constant smiling or added expressions.Animate the eyes, cheeks, lips and jaw as a coordinated facial performance. Let the beard move naturally with the jaw and mouth; keep expressions readable through the glasses. Stable identity means recognizable facial anatomy while expressions change, not immobile features.CHARACTER AND OUTFIT
Use panels 01–04 for body and wardrobe, 05 for frontal likeness and 06 for profile. Preserve his facial structure, apparent age, natural skin texture, short dark hair, full salt-and-pepper beard and exact eyeglass design. Transfer expression without borrowing the original performer’s identity.Match the black crew-neck sweater, charcoal-gray trousers and black leather lace-up ankle boots. Retain his build and realistic clothing movement. Render one person; exclude the sheet’s panels, captions and peach background.MOVEMENT AND SCENE
Preserve the original choreography, footwork, weight shifts, gestures, head movements and path through the room. Adapt these naturally to the new character’s proportions and boots, with grounded feet.Preserve camera work, framing, perspective, duration, warm interior lighting, shadows, depth of field and motion blur. Update floor and glass reflections to match the new character. Produce photorealistic live-action footage with a recognizable, responsive face throughout.
Do not add music.
Veo 3.1
One continuous, photorealistic four-second shot starting from the uploaded portrait.
The camera makes an extremely slow, smooth forward dolly-in at eye level, ending only slightly closer than the starting frame. Maintain the original camera angle and a stable composition, keeping the top of the head and the luggage brooch visible. The subject remains in place as the camera gently approaches.
The subject maintains the original pose, direct gaze, and calm, neutral expression. Human movement is limited to barely perceptible natural breathing and, at most, one soft, relaxed blink. The head stays steady, the mouth remains relaxed and closed, and the posture remains unchanged. The movement should be so subtle that the portrait initially appears still.
Preserve the reference likeness, facial proportions, natural skin texture, hair, beard, glasses, clothing, and luggage brooch consistently throughout. Keep the glasses and brooch stable in shape and placement. Maintain the original background, lighting, colors, and exposure, with sharp eyes, stable focus, and subtle natural reflections.
The overall feeling is quiet, confident, and cinematic, like a still luxury editorial portrait gently coming to life. Ease the camera movement to a soft stop at the end. Silent video. No speaking, gestures, head turns, expression changes, camera shake, added sparkles, text, or graphics.
Ray3
Using the uploaded portrait as the first frame, the camera is dollying forward extremely slowly in one smooth, continuous shot at eye level, ending only slightly closer while keeping the top of the head and luggage brooch visible.
The subject holds the original pose and direct gaze throughout; the head position, chin height, and neck angle remain steady, the shoulders stay relaxed and settled, and the mouth remains gently closed with the original calm expression.
Human movement is limited to barely perceptible breathing low in the chest and, at most, one brief natural blink; the body remains at rest, and the camera provides almost all visible motion, with a gentle, controlled pace that settles smoothly at the end.
Preserve the subject’s exact likeness, facial proportions, natural skin and beard texture, glasses, clothing, and brooch, maintaining the original background, lighting, colors, subtle reflections, and sharp facial focus throughout—a quiet, understated cinematic portrait that initially appears still.
Weapon of Choice - Fatboy Slim